
These Christmas Cakesicles bring pure joy to the holiday season. Each one is a tiny bite of chocolate-coated happiness. The soft, sweet cake inside feels like a warm Christmas hug cozy, cheerful, and full of love.

Making these cake popsicles is fun and easy. You mix crumbled cake with frosting, shape it, and dip it into smooth, melted chocolate. Decorate with crushed candy canes, sprinkles, or gold shimmer for that magical holiday sparkle.
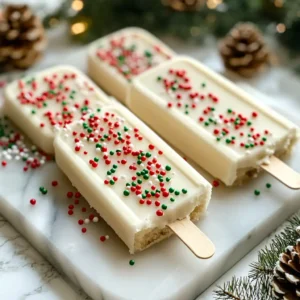
These treats don’t just taste amazing they look stunning too. Line them up on a platter, wrap them as gifts, or add them to your dessert table. Everyone’s face will light up when they see them.
I’ll show you how to make perfect Christmas Cakesicles at home. You’ll learn how to get a smooth shell, prevent cracks, and even make vegan cakesicles so everyone can enjoy them.
So grab your molds, melt your chocolate, and start creating these adorable, festive treats. Your kitchen will smell like Christmas, and your heart will feel it too.
Learn more about creating a festive morning spread in this cozy Christmas Pancakes Recipe a sweet match for your holiday dessert table.
Why Christmas Cakesicles Will Become Your Family’s Favorite
They Bring Instant Holiday Joy
There’s something magical about Christmas Cakesicles that instantly makes everyone smile kids, parents, and even the grumpiest uncle at the dessert table. These little cake popsicles have a way of turning simple ingredients into joy-filled moments that everyone remembers.
They’re colorful, creative, and easy to eat. Because they don’t require forks or plates, they’re perfect for parties, family gatherings, and cozy nights by the tree. Moreover, each one looks like a tiny edible gift beautifully coated in chocolate and sprinkled with holiday cheer. As a result, when you place a tray of them on the table, they vanish faster than you can say “Merry Christmas.”
Easy to Customize for Every Celebration
Another reason families adore them is how personal they can be. You can easily match each cakesicle to your holiday theme red and green for classic cheer, gold and white for elegance, or pastel tones for a winter wonderland feel. In addition, it’s a wonderful way to let kids help with decorating. This not only sparks creativity but also creates sweet family memories along the way.
Perfect for Busy Holiday Schedules
Christmas can get hectic, and that’s exactly why these desserts are so special. Between wrapping gifts and preparing dinner, you’ll appreciate a treat that’s both simple and stress-free. You can bake the cake ahead of time, mix and shape the filling the day before, then coat and decorate when you’re ready. Because they store beautifully in the fridge or freezer, they’re ideal for make-ahead desserts or edible gifts.
Irresistible in Every Bite
Best of all, they taste incredible. The contrast between the crisp chocolate shell and the soft, moist cake inside is simply irresistible. Whether you use vanilla, chocolate, or red velvet, every bite feels like a celebration of the season itself.
So, it’s no wonder Christmas Cakesicles become a family favorite year after year. Once everyone tries them, no dessert table will ever feel complete without their festive sparkle and sweet charm.
The Ingredients You Need

Before you start making your Christmas Cakesicles, gather everything you’ll need. The magic of these festive treats lies in their simplicity soft cake, creamy frosting, and a silky chocolate coating that brings everything together. Once you have the basics ready, you can easily mix and match flavors, colors, and textures to create your own holiday masterpiece.
The Cake Base
You can use almost any cake for cakesicles, and that’s exactly what makes them so fun. Whether you prefer vanilla, chocolate, or red velvet, the results will be delicious. In fact, if you have leftover cake from another recipe, this is the perfect way to give it a second life.
You’ll need:
- 2 cups crumbled cake (baked and cooled)
- 2–3 tablespoons frosting (just enough to hold the crumbs together)
Tip: Combine the cake and frosting gradually. Too much frosting can make the mixture sticky, while too little makes it crumbly. The texture should feel like soft cookie dough moist but firm.
Vegan Option: For vegan cakesicles, simply use a dairy-free cake recipe and vegan buttercream. You can also add a splash of coconut or almond milk frosting for creaminess. Check out this luscious Vegan Oreo Cake for more plant-based inspiration it’s rich, creamy, and absolutely delicious.
The Chocolate Coating
The smooth outer shell gives cakesicles their signature shine and satisfying snap. Because it’s what everyone sees first, using good chocolate makes a big difference. You can choose white, milk, or dark chocolate depending on your flavor preference or holiday color theme.
You’ll need:
- 1 ½ cups of high-quality chocolate or candy melts
- 1 teaspoon coconut oil (optional, for extra shine)
Best Chocolate Tip: Always melt your chocolate slowly and stir often. As a result, you’ll get a silky, lump-free coating that’s easy to work with. If you’re making vegan cakesicles, choose dairy-free chocolate dark chocolate works beautifully and tastes rich without being overly sweet.
The Decorations
Now comes the most enjoyable part decorating! This is where your Christmas Cakesicles truly come to life. You can go for classic red and green, elegant gold and white, or even pastel tones for a winter wonderland look.
Ideas include:
- Festive sprinkles or edible glitter
- Crushed candy canes for crunch and color
- White chocolate drizzle tinted with natural food coloring
- Mini sugar snowflakes, gold pearls, or tiny fondant bows
Pro tip: If you’re gifting them, wrap each cakesicle in a clear treat bag and tie it with a red or gold ribbon. Not only will they look adorable, but they’ll also stay fresh for several days.
The Equipment
Thankfully, you don’t need professional tools to make stunning cakesicles. However, having the right basics will make the process much smoother.
You’ll need:
- Silicone cakesicle molds
- Popsicle sticks
- Microwave-safe bowl (for melting chocolate)
- Small offset spatula or spoon
If you plan to make several batches, it helps to have extra molds. That way, you can prepare more at once and keep your baking flow going without delays.
How to Make Christmas Cakesicles Step-by-Step

Making Christmas Cakesicles is easier than it looks. With a few simple tools and a little patience, you’ll have a tray of adorable cake popsicles ready to brighten your dessert table. Let’s walk through it together!
Step 1: Bake and Crumble the Cake
First, bake your favorite cake and let it cool completely. You can use vanilla, chocolate, or red velvet for a festive touch. Once it’s cool, crumble the cake into fine pieces using your hands or a fork. The crumbs should be soft and even.
Next, add a spoonful of frosting at a time, mixing gently until the cake mixture comes together. It should hold its shape when pressed but not feel sticky. If it’s too dry, add a bit more frosting. If it’s too soft, add a few extra crumbs.
Tip: Because overmixing can make the filling heavy, stop as soon as it feels smooth and moldable.
Step 2: Fill the Cakesicle Molds
Now it’s time to form your cakesicles. Melt a small portion of your chocolate or candy melts in the microwave in short 20-second bursts, stirring between each one. Once smooth, spoon a little chocolate into each silicone mold and use the back of a spoon to coat the sides evenly.
After that, insert the popsicle sticks and let the chocolate shells set in the fridge for about 5–10 minutes. Once firm, gently press your cake mixture into each mold, leaving just enough room to seal the top with more melted chocolate.
Transition tip: Work slowly and keep your chocolate warm this helps prevent cracks later.
Step 3: Seal and Chill the Cakesicles
Pour more melted chocolate over the filled molds to cover the cake completely. Smooth the surface with a small spatula or the back of a spoon. Then, place the molds in the fridge for another 10–15 minutes until the chocolate hardens.
Once the shells are firm, carefully pop each cakesicle out of the mold. Do this gently to keep the edges smooth. You’ll see that glossy, perfect coating that makes these treats so stunning.
Step 4: Decorate Like a Pro
Now comes the fun part decorating! You can drizzle melted white chocolate over the top, add crushed candy canes for crunch, or dust them with edible glitter for sparkle. Because it’s Christmas, the brighter and bolder, the better!
For an elegant look, try a swirl of gold luster dust or a drizzle of red-tinted white chocolate. For kids, go wild with sprinkles, mini marshmallows, or snowflake-shaped sugar pieces.
Pro tip: Let your decorations set completely before wrapping or storing. This keeps them looking fresh and prevents smudging.
Step 5: Store or Gift Your Cakesicles
Finally, once the chocolate has set, store your cakesicles in an airtight container in the fridge for up to one week. If you’d like to gift them, wrap each one in a clear cellophane bag and tie it with a festive ribbon. They make perfect party favors or thoughtful homemade gifts for neighbors and friends.
Because they freeze well, you can even prepare them weeks in advance. Simply thaw them in the fridge overnight before serving they’ll taste just as amazing.
Frequently Asked Questions About Christmas Cakesicles
The best chocolate for Christmas Cakesicles is high-quality chocolate with a high cocoa butter content. It melts smoothly and gives that perfect glossy shell. You can use milk, dark, or white chocolate depending on your taste. However, candy melts are a great alternative if you want easier handling and quicker setting. For vegan cakesicles, choose dairy-free dark chocolate or vegan candy melts for the same smooth finish.
Cracking usually happens when the chocolate coating sets too fast or is too thin. To avoid this, let your cakesicles come to room temperature before dipping them in chocolate. Also, make sure your chocolate isn’t too hot warm but not steaming is ideal. If your fridge is very cold, allow the coated cakesicles to rest for a few minutes before chilling them again. This small step prevents sudden temperature shocks that cause cracks.
Silicone molds work best because they’re flexible and easy to release once the chocolate sets. They come in different shapes and sizes, but a standard oval mold is perfect for Christmas Cakesicles. In addition, look for molds with smooth interiors so your chocolate coating looks shiny and professional. If you plan to make several batches, investing in a few extra molds can save you time.
Absolutely! Making vegan cakesicles is simple. Use a dairy-free cake recipe, plant-based buttercream, and vegan-friendly chocolate. You can also replace regular milk with coconut or almond milk to keep the texture creamy. As a result, you’ll get delicious Christmas Cakesicles that everyone including vegan guests can enjoy.
Let Me Know If You Fall in Love with Christmas Cakesicles

And there you have it the most charming little treats of the holiday season: Christmas Cakesicles! These festive cake popsicles combine everything we love about Christmas cozy baking days, sweet scents of chocolate, and the joy of sharing homemade desserts with the people we love.
What I adore most about this recipe is its versatility. You can make them colorful for kids, elegant for parties, or vegan and gluten-free so everyone feels included. Each batch is a chance to get creative, to play with flavors, and to bring happiness into your kitchen.
So, as you dip, drizzle, and decorate your cakesicles, I hope you’ll feel that same spark of joy that makes the holidays so special. Take a photo, wrap a few as gifts, and share them with someone you love because sweetness is meant to be shared.
If you try this recipe, I’d love to hear how your Christmas Cakesicles turned out! Leave a comment, share your favorite flavor twist, or tag your creations online.
Learn more about pairing these treats with other chocolatey favorites in my Chocolate Peanut Butter Cupcakes they’re a match made in dessert heaven!
Christmas Cakesicles
Equipment
- 1 Silicone cakesicle mold Flexible, easy to release
- 1 Mixing Bowl For combining cake and frosting
- 1 Spoon or spatula To mix and smooth chocolate
- 1 Popsicle sticks Wooden or reusable
- 1 Microwave-safe bowl For melting chocolate
Ingredients
Main Ingredients
- 2 cups Crumbled cake Any flavor: vanilla, chocolate, or red velvet
- 3 tablespoons Frosting Buttercream or vegan buttercream
- 1 ½ cups Chocolate or candy melts For coating the cakesicles
- 1 teaspoon Coconut oil Optional, for shiny chocolate
- ¼ cup Festive sprinkles For decoration
- 1 pinch Crushed candy canes Optional, for texture
Instructions
- Bake your chosen cake and let it cool completely. Then crumble it into fine pieces using your hands or a fork.
- Add frosting a spoonful at a time and combine gently until the mixture holds together like soft cookie dough.
- Melt chocolate in 20-second microwave bursts, stirring in between. Coat the inside of the silicone molds with chocolate and insert the popsicle sticks. Chill for 5 minutes.
- Press the cake mixture into each mold, leaving a little space at the top. Cover with more melted chocolate to seal.
- Place molds in the fridge for 10–15 minutes, until chocolate sets completely.
- Drizzle extra chocolate, add sprinkles, or top with crushed candy canes. Let decorations harden before handling.
- Remove cakesicles gently from molds. Store in an airtight container in the fridge for up to 1 week or freeze for up to 1 month.